Introduction
Welcome to RapidRetail (RR)! This package is designed to help you quickly and effortlessly sell items (including clothing, jewellery, and accessories) on the Web.
RR is written using the Ruby on Rails framework. It uses JavaScript, including Hotwire and jQuery to enhance usability, but all features of RR are fully usable without JavaScript. It is also regularly tested to conform to best practices around accessibility using tools such as the IBM Equal Access Accessibility Checker.
If you are using a Wilcox Technologies hosted site, dive right into the Merchant Guide to start setting up your very own Web storefront!
If you are setting up your own server, read the Deployment Guide first - it has all the details on how to deploy RR fast and securely.
This work by
Wilcox Technologies Inc.
is licensed under
CC BY-SA 4.0
![]()
![]()
![]()
Requirements
To use RR as a patron (someone who buys items), you will need:
- A Web browser that supports HTML 5 and TLS 1.2.
- To accept cookies.
To use RR as a merchant (someone who manages the storefront), you will need:
- A Web browser that supports HTML 5 and TLS 1.2.
- To accept cookies.
- Many features are improved if you have JavaScript enabled, and use the current version of Firefox ESR, Safari, or IE 9+. Safari on iOS 7+ and Firefox on Android are also supported, but some features may not work ideally when using mobile browsers.
To run RR on your own server infrastructure, you will need:
- A system capable of running Ruby on Rails, including native extensions.
- Typically, 512 MB of available RAM (not total system RAM) is highly recommended.
- RR does not require much disk space itself - nominally about 100 MB - but uploaded photos, cached items, and logging may require significantly more disk space. Please plan carefully, as running out of disk space could impact the ability of patrons to place orders.
- A PostgreSQL database server.
- A SAML gateway for authentication.
Heavily trafficked storefronts (more than 1 request per second) may require additional resources.
Admin Dashboard
When you browse to your new storefront, the first thing you'll want to do is to configure your storefront's settings, and then create some collections and list items for sale. You accomplish these tasks, and more, by using the Admin Dashboard.
You can visit the Admin Dashboard by adding '/admin/' to the end of your store domain. For instance, if your storefront is located at https://mynewstore.example/, your admin dashboard will be accessed at https://mynewstore.example/admin/.
You will need to log in to the Admin Dashboard before you can start using it; this is to prevent unwanted changes by people not associated with your business. Your site administrator should have provided you with a username and password to use for logging in to the Admin Dashboard.
For Wilcox Technologies hosted sites, you will use your Success Partner credentials.
Navigating the Dashboard
Once you have signed in, you will be greeted with the Dashboard, which appears similar to the below image:
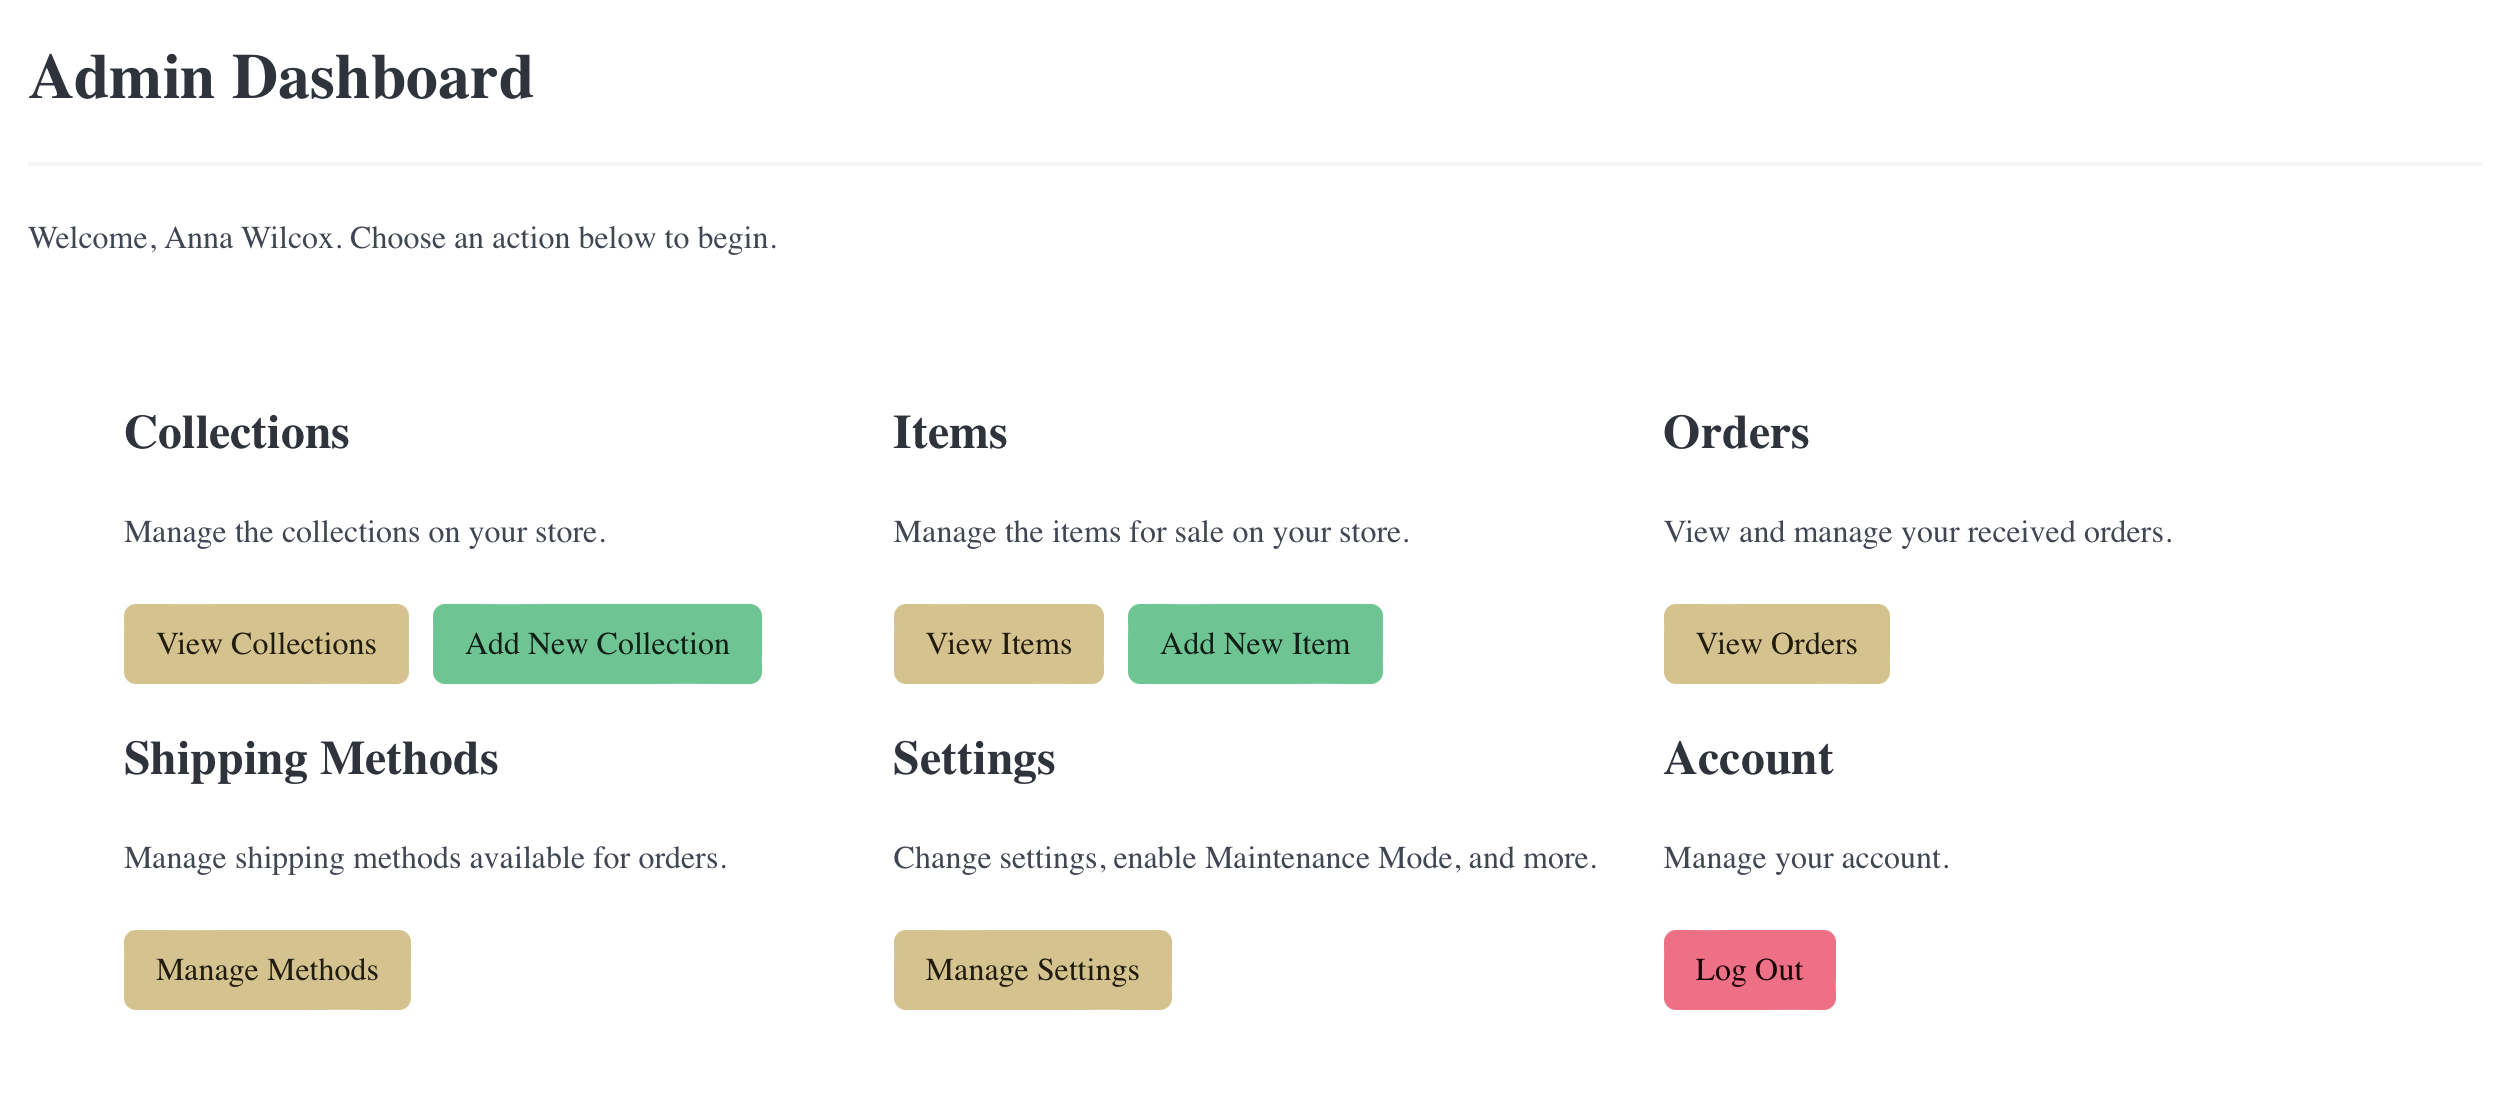
For more information about how each action works, see the associated chapter. Congratulations! You are ready to begin using RR.
Keeping Your Store Secure
- Never share your username or password.
- When you are finished making changes to your storefront, return to the main screen and choose 'Log Out'.
- If you are using a shared computer, such as at a library or Internet café, don't choose 'Remember Me' or save your username or password to the browser.
- If you are running RR on your own server, ensure you update regularly.
Settings
You can customise your storefront's branding, and other settings, easily. The Admin Dashboard allows you to change settings at any time you like, and you don't need to worry about restarting or reloading your store after making a setting change. RR will take care of that for you.
Maintenance Mode
This will temporarily show an "under maintenance" page for all non-admin pages. This allows you to work on your storefront without patrons being able to complete orders. This can be useful if you are updating prices on a number of items, or you are facing a natural disaster that prevents you from fulfilling orders.
Ensure you disable Maintenance Mode when you are ready to accept orders again.
Store Name
This is the name used in the title of every page, and at the header and footer of all pages. It is also used to greet customers in order pages and in email communication.
Home Page Content
You can set the text displayed above and below the top level Collections to whatever you like. HTML tags are accepted. Make sure that your tags are balanced properly to avoid rendering issues on your home page.
About Page Text
You can set the text displayed in the About page to whatever you like. If you don't provide any text, a link to the About page won't be displayed.
Your About page can have HTML content in it, including scripts and images.
Show Trending / Featured
You can choose whether to show the Trending and Featured sections on the home page. The Trending section shows the most popular three Collections over the past week, and the Featured section shows the most popular three Items over the past week.
Policy Content
You can enter your return policy, shipping policy, privacy policy, and terms of service for your storefront in the provided fields. HTML tags are accepted.
Contact Page Content
You can set the text displayed in the Contact page to whatever you like. If you don't provide any content, a link to the Contact page won't be displayed. Tip: Most customers prefer to buy from storefronts where they can clearly see a method of contact, so make sure you fill this in with your contact details!
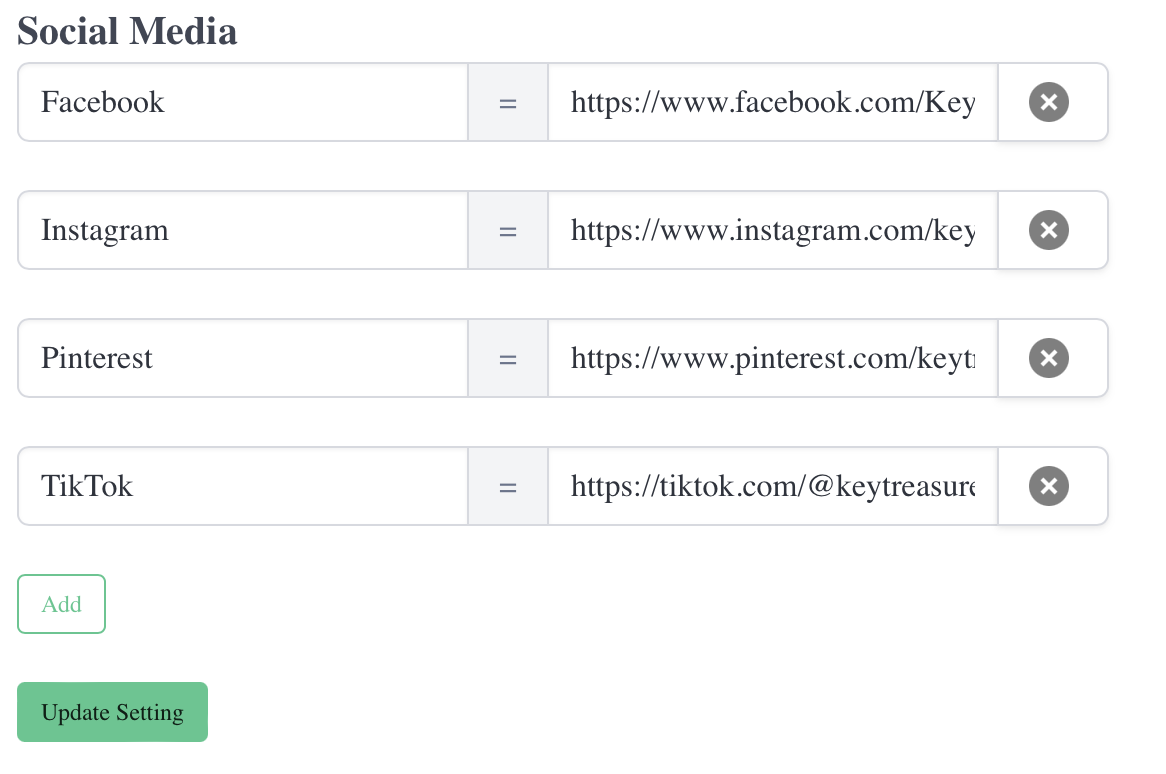
Social Media
You can enter links to your storefront's social media profiles. The left side text box should have the name of the social media site, and the right side should have the URL to your profile.
The below image shows an example of a storefront that has four profiles: Facebook, Instagram, Pinterest, and TikTok:
Facebook App ID
If you have a Facebook App ID assigned to your storefront - for example, if you have a Page on Facebook - you can paste the ID here to enable the following features:
- Share to Facebook button on items.
- Sign in with Facebook support for customers.
Currency Code
Choose the currency you prefer to use.
Tip: You can only choose currencies supported by Stripe.
Sign Ups Take Ownership
Orders can be placed by customers without signing up for an account with your storefront. This is also called "Checkout As Guest".
If a customer checks out as a guest, they must still provide their email address. This is used to provide them updates on their order, and to allow you to contact them should the need arise.
If the customer later signs up with the same email address, and confirms their email address, then prior orders associated with that email address will be assigned to their new customer account. This allows them to see their entire order history with your storefront. This is only done after the customer has confirmed their email address, which means they have proven access to that email address.
If there is a reason, whether for privacy or security, that you do not wish this behaviour to occur, you can choose "False" and prior orders will not be assigned to the new customer account on sign-up.
Branding
Logo
This is the image shown at the top left of the navigation bar.
Colours
You can select the colour used for links and the nav bar.
Stripe API Credentials
These are the credentials used to connect to Stripe. Make sure these are correct, as that is how you will be paid for orders!
Collections
In RR, items are categorised into one or more Collections. A Collection is similar to the concept from the fashion world: a group of related items that share design language or have cohesion in some manner.
Items can belong to more than one Collection if you like, but all items must belong to at least one Collection to be found and purchased by your patrons.
Anatomy of a Collection
The following fields are part of every Collection in your storefront.
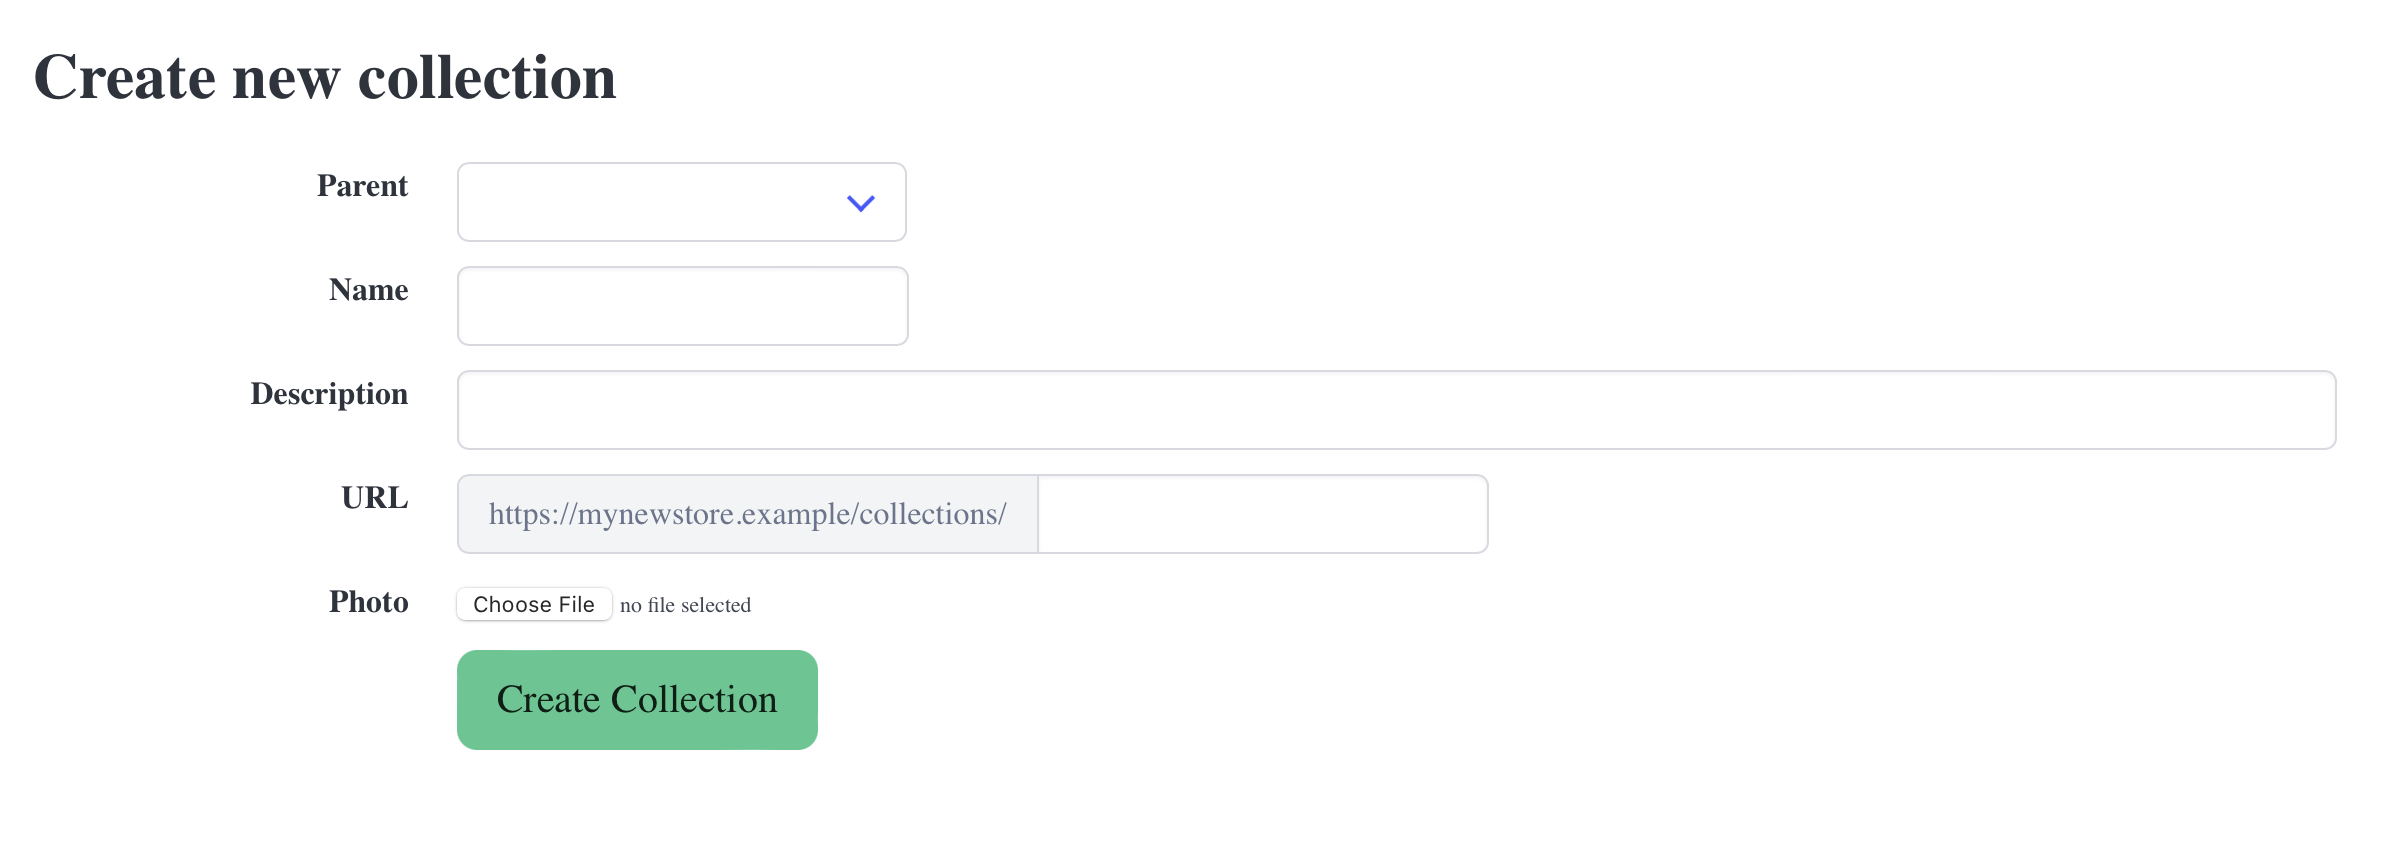
Parent
You can create a hierarchical tree of Collections by choosing a parent. If you don't choose a parent for your Collection, it will belong to the "top level" and show up on your storefront's home page and top navigation.
Name
Give some thought to the name of your Collection, as it will serve as the title of the Collection's page, and show up in the 'breadcrumb' link on each item's page that is a part of the Collection.
Tip: Don't include the word 'Collection' in the name of the Collection. RR will automatically add the suffix 'Collection' where applicable.
Description
Your description will show in the Collection's page, and also be used for the Meta Description of the HTML page. This is important for SEO (Search Engine Optimisation). Make sure it includes important keywords so that Web surfers can find your storefront.
For example, a Collection that contains turquoise earrings might have a description of:
Buy elegant turquoise earrings from My Store Name in a variety of styles, including faceted drops and dangles. Goes great with any outfit!
URL
The URL of a Collection is also important for SEO. It should be all lower-case and use dashes instead of spaces. Again, since 'collection' will already appear in the URL, don't include the word Collection.
For our Turquoise Earrings collection example, a good choice might be
turquoise-earrings.
Photo
You can include a photo for the Collection which will be displayed above the collection name on the parent Collection's page, or the home page if your Collection is on the top level (no parent).
You don't have to include a photo, but photos can entice your patrons to explore further.
Your photo must be at least 800 × 800 pixels, and in JPEG, PNG, or WebP format. Usually, you will want the photo to be an example item from the Collection that showcases it, or perhaps a collage of multiple items.
Creating a Collection
From the main Admin Dashboard or the Collection list, choose Add New Collection. The New Collection form will display.
Viewing Collections
From the main Admin Dashboard, choose View Collections. The Collection List will display. A summary of each Collection will be shown in its card.
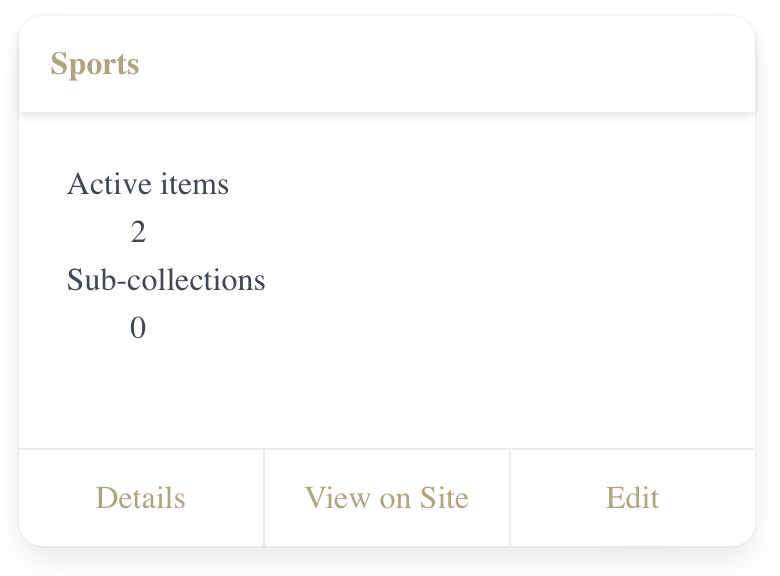
You can view more details about a Collection, including the items present in the Collection, by choosing its name or the 'Details' button at the bottom of its card.
You can view a Collection on your storefront by choosing 'View on Site' at the bottom of its card.
You can edit any of the fields of the Collection by choosing 'Edit' at the bottom of its card.
Collection Details Page
The Collection Details page contains information about the Collection, the items contained in the Collection, and quick action buttons to manage the Collection.
The name of the parent, if any, is linked to the details page of the Collection's parent. This makes it easy to 'travel up' your Collection tree.
The Public URL shows the URL for your collection, and is also linked to the Collection's page on your storefront. You can use this link to see your Collection as your patrons will see it, or send it to someone who is interested in seeing it.
Items
Each item contained in your Collection will be displayed in the Items section of the Collection Details page. Each item is hyperlinked to the item's page on your storefront, so you can easily view it or share it.
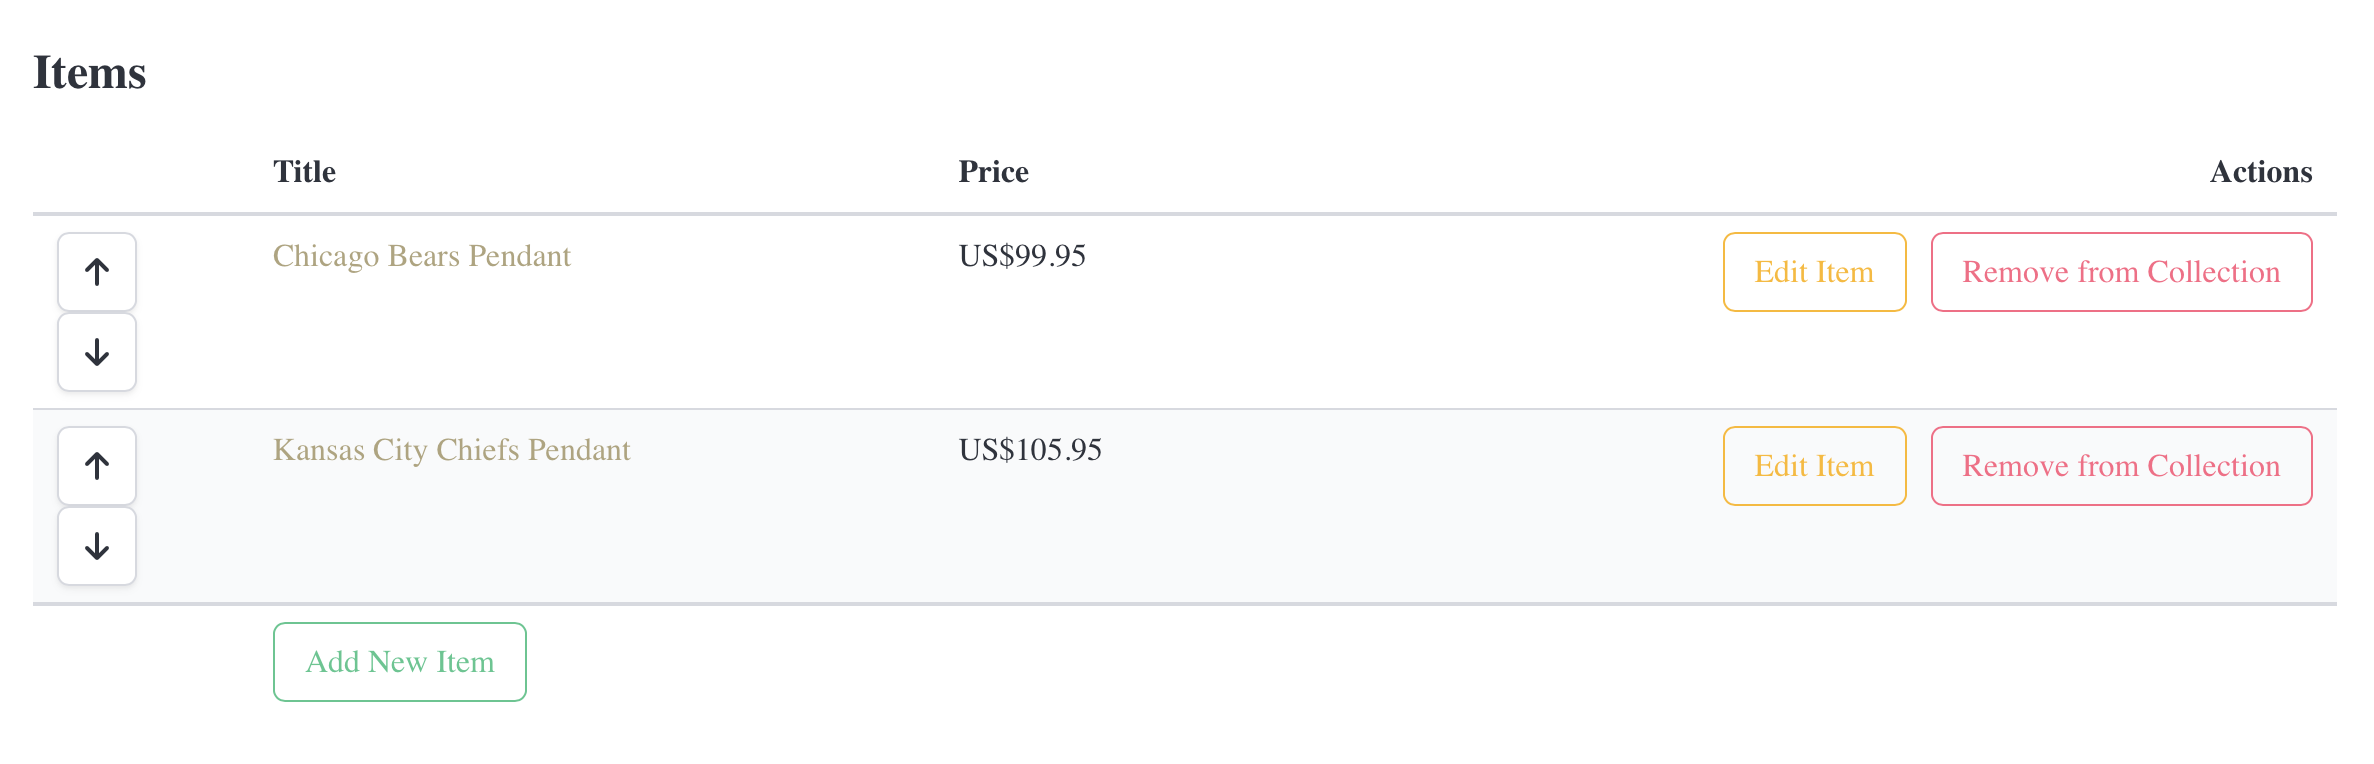
Actions allow you to quickly edit an item directly from the Collection Details page. You can also remove the item from the Collection. Note that removing an item from a Collection does not remove the item from your storefront and it won't affect other Collections that contain the item.
There are directional arrow buttons next to each item. This allows you to reorder the items within the Collection. If you want to highlight a specific item, you can move it to the top of the Collection's page.
You can also choose 'Add New Item' from the Collection Details page to start creating a new item with this Collection already chosen for you in the New Item form.
Items
In RR, your storefront can have a few items, or thousands. Each item is a single product for sale on your storefront. Once an item is created, it is immediately available for purchase.
An item may belong to any number of Collections. For instance, you may have a Summer Collection and an Activewear Collection. You can place a pair of running shorts in both of these Collections. When you change the item's price, description, or available quantity, it updates in all Collections.
Anatomy of an Item
The following fields are part of every item in your storefront.
Collection(s)
The Collection that contains this item. You may select more than one Collection to contain a single item.
Photos
You may upload one or more photos of the item. Photos are optional, but it is very difficult to sell items over the Web without at least one photo.
Name
The name or title of the item.
Custom SKU
You can provide a custom SKU for any item in your storefront. This can be for your own reference, or allow you to integrate with an existing inventory system. If you don't specify a custom SKU, items in your storefront will be numbered sequentially from "1".
Description
Your description will show in the item's page, and also be used for the Meta Description of the HTML page. This is important for SEO (Search Engine Optimisation). Make sure it includes important keywords so that Web surfers can find your item.
Quantity Available
Enter the number of this item that you presently have available. Each time someone orders the item, RR will automatically decrement this number. If it reaches zero, patrons will no longer be able to buy the item - it will show as out of stock. Be sure to keep this number updated as you create more of the item to replace it as it sells.
Pinterest Pin ID
If you have a Pin ID for this item on Pinterest, you can paste the Pin ID in this field. Your customers will then be able to Pin your item to their own boards.
Price
Enter the price of the item in the currency that you have selected for your storefront.
Creating an Item
From the main Admin Dashboard or the item list, choose Add New Item. The New Item form will display.
You can also create an item from a Collection Detail page by choosing Add New Item at the end of the Items section. The New Item form will display with the Collection you were viewing added already.
Managing Items without JavaScript
When JavaScript is not enabled, you can only add one Collection at a time to an item. When you have finished filling in the item's details, choose Create Item, then choose Edit This Item from the following screen. A selection box for another Collection will be displayed next to the name of the other Collection. You may repeat this as many times as you like to add more Collections to an item.
When JavaScript is not enabled, you cannot remove an item from a Collection from the Update Item form. You must use the Collection Details page of the Collection, and then choose Remove from Collection next to the item you wish to remove from the Collection.
Shipping Methods
RR allows you to specify multiple shipping methods that your customers can choose from when placing their order.
Anatomy of a Shipping Method
The following fields are part of every shipping method in your storefront.
Vendor
The vendor of the shipping method. This will not be displayed to the customer directly. It is used for providing tracking links and shipment updates from the vendor.
Presently, only USPS, UPS, and FedEx are supported as vendors. If you need a different shipping vendor, contact WTI Client Care.
If you have programming knowledge, you may also see the Developer Handbook for information on how to add additional shipping vendor support to RR.
Name
The name of the shipping method. You can write whatever you like here. Your customers will see what you write here in the shipping method choices when placing their order on your storefront.
It is highly recommended to be descriptive, such as "USPS Priority Mail". Customers can be suspicious of vague phrasing like "Standard Shipping" or "Economy Shipping".
Price
The price of the shipping method. Presently, RR only supports flat rate shipping options. If you require variable shipping rates based on item selection, contact WTI Client Care.
Enabled
Each Shipping Method may be Enabled or Disabled. Customers will only be able to choose from Enabled shipping methods. You can disable a shipping method at any time by choosing the Edit action next to its name, and unticking the Enabled tickbox.
Removing a Shipping Method
Once a shipping method has been used for at least one order, it cannot be removed, as it would invalidate the ability for customers to track any shipments associated with the order. If you wish to remove a shipping method that has already been associated with an order, simply disable it.
Orders and Shipments
Pages
You can add custom pages to your RapidRetail storefront. These can contain any content you like; a story about how you create your items, a page for your physical store, or testimonials. The only limit is your imagination!
Anatomy of a Page
The following fields are part of every page in your storefront.
Title
The title of the page. This is displayed on the top of the page, and is also the title that search engines will see.
URL
This is the URL that your page will use. It should only contain letters, numbers, and dashes (-). Letters in your URL should be not be capitalised.
Title on Nav Bar
The title of the link in the top navigation bar on your store. We highly recommend you use a short title for your navigation bar link, so that you have enough room for the rest of the content.
Description
This description will be sent to search engines as a brief summary of the page. For instance, if your page is for testimonials, you may write:
Read reviews and testimonials about how much people love My Storefront!
Content
The actual content of the page. Content is written in "Markdown" format, and a rich text editor is provided for your convenience.
Authentication
Using Docker
We highly recommend using Docker's Compose feature, to ensure the database is in the same container group as the RR container.
This is an example docker-compose.yml file for running RR with the
database content stored in the db_data directory beside the compose file:
name: mall

services:
  postgres:
    image: postgres:16-alpine
    restart: unless-stopped
    security_opt:
      - no-new-privileges:true
    pids_limit: 100
    read_only: true
    tmpfs:
      - /tmp
      - /var/run/postgresql
    volumes:
      - ./db_data:/var/lib/postgresql/data
    environment:
      - TZ
      - POSTGRES_USER
      - POSTGRES_PASSWORD
      - POSTGRES_DB

  website:
    depends_on:
      - postgres
    image: registry.atwilcox.tech/infrastructure/mall:latest
    restart: unless-stopped
    security_opt:
      - no-new-privileges:true
    pids_limit: 100
    environment:
      - TZ
      - MALL_DOMAIN
    volumes:
      - ./log:/srv/mall/log
    ports:
      - 127.0.0.1:4000:3000
You'll need to provide a production.yml.enc file and a production.key
which are Rails credential files. More information about working with Rails
credentials can be found in the Rails Guides.
An example, decrypted production.yml.enc is below:
sso:
  idp_url: https://keycloak/realms/mycorp/protocol/saml/clients/retail
  idp_cert: |
    the certificate should be here.
facebook:
  secret_key: Facebook Key here
apple:
  bundle_id: your.apple.bundle.id
  key_id: apple_key
  team_id: apple_team
  p8_content: |
    the key should be here.
paypal:
  client_id: client_id
  client_secret: ENC_secret
stripe:
  api_key: sk_test_...
database:
  host: postgres-retail
  database: db_prod
  username: username
  password: your password here
secret_key_base: ...
Social Sign Ins
RR can allow your customers to sign in with their existing social accounts. This is better for everyone: customers do not have to remember another password, and your storefront is not storing the customer's password.
Each social account type has its own requirements and set up procedure. Once they are set up, customers can begin signing in with them right away.
Sign in with Apple
To allow customers to sign in with Apple, you will need to have an active Apple Developer account and pay the yearly developer registration fee to Apple.
This is another reason using Wilcox Technologies hosting can save you a lot of money - Sign in with Apple support is included for free!
You will need a valid App Bundle ID, a Service ID, and a Key to set up the Sign in with Apple service.
You'll need to set the apple key variables in your Credentials file before
starting RapidRetail.
bundle_id: The bundle ID for your service.team_id: The team ID for your service.key_id: The key ID for the key created for authentication.
You will additionally need one of the following two options:
- Either
p8_content: the content of the .p8 key file, - OR
p8_file: the path to the .p8 key file.
Ensure that the .p8 key file ends in a terminating newline. This may need to be added to the file you download from Apple Developer Relations.
Sign in with Facebook
To allow customers to sign in with Facebook, you will need to have an active Facebook app registration with Meta Developers.
You'll need to set the facebook/secret_key credential variable before
starting RR. Set your Facebook App ID in the Settings panel.